Interface HD44780 compatible LCDs with RCM3720
![]()
![]()
These are my notes of connecting a RCM3720 RabbitCore Ethernet Development kit, using the supplied development board and a Sunlike SC1602BSLB 2x16 LCD display.
Schema: 8-bit mode interface
HD44780-compatible displays can be connected in 8-bit and 4-bit mode. While the 4-bit mode cuts down on valuable in/out pins, it complicates programming. In addition to the 8 data lines, we need 3 control lines plus power (GND, VDD). Finally there is a contrast-regulating V0 line for use with a variable resistor, or simply connect to GND for max contrast. On the microcontroller, I selected port-A for the 8 data lines. The control lines I put on 3 of the remaining free port-B pins. Port-B is partially blocked by the development board and the internal clocks.
Physical installation on the development board

With 14 lines to connect, the Sunlike SC1602BSLB display conveniently provides two rows of 7 soldering holes in a raster to fit a standard 14 pin wiring terminal. Because of limited breadboard space, I placed a female terminal close to the 40-pin RabbitCore breakout terminal while soldering the male terminal to the display itself. I placed a second 'dummy' terminal at the other end of the display, using the holes for the external backlight connections.

Learning how to programm the parallel LCD display
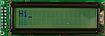
Once we power-up the development board, the LCD display should give us a sign of life, showing a row of black squares in the upper line. This is normal for a uninitialized display. Let's create a first test program in Dymanic 'C' named Rabbit_RCM3720_to_HD44780LCD_example1.c, simplified as much as possible. We are trying to display two characters 'Hi', using the code below.
/***************************************************************************/
/* Rabbit_RCM3720_to_HD44780LCD_example1.c   http://fpga.fm4dd.com/        */
/*                                                                         */
/* Written for a 16x2 HD44780 compatible LCD display on a Rabbit RCM3720   */
/* Ethernet Development Kit. Connected in 8bit mode with datalines going   */
/* to port A while RS, E and RW are connected to Port B on B2, B3 and B4.  */
/* Written and tested under Dynamic C Version 9.21       Frank4dd, @2008   */
/***************************************************************************/
#class auto

#define RSADDR       2                         // Register Select   port B-2
#define ENADDR       3                         // Enable signal     port B-3
#define RWADDR       4                         // Read/Write signal port B-4

void MsDelay(unsigned long milliSeconds) {
  unsigned long ul0;
  ul0 = MS_TIMER;                              // get the current timer value
  while(MS_TIMER < ul0 + milliSeconds);
}

LcdWrite(int mode, char hex) {
  BitWrPortI(PBDR, &PBDRShadow, mode, RSADDR); // Choose command or data mode
  BitWrPortI(PBDR, &PBDRShadow, 0,    RWADDR); // Set LCD write mode
  WrPortI(PADR, &PADRShadow, hex);             // Set LCD command on port A

  MsDelay(1);
  BitWrPortI(PBDR, &PBDRShadow, 1, ENADDR);    // Start sending data
  MsDelay(1);                                  // Wait 1 ms for LCD to receive
  BitWrPortI(PBDR, &PBDRShadow, 0, ENADDR);    // Finish transmission
  MsDelay(1);                                  // Wait 1 ms until next write
}

void main() {
  brdInit();                                   // Enable development board
  WrPortI(SPCR, NULL, 0x84);                   // Set Rabbit port A to output
  WrPortI(PADR, &PADRShadow, 0x0);             // Zero out all bits of port A

  LcdWrite(0, 0x30);
  MsDelay(4);
  LcdWrite(0, 0x30);
  LcdWrite(0, 0x30);
  LcdWrite(0, 0x38);                           // Send "8bit, 2 lines, 5x7 font"
  LcdWrite(0, 0x06);                           // Send "entry mode, increm. move"
  LcdWrite(0, 0x10);                           // Send "display and cursor shift"
  LcdWrite(0, 0x0E);                           // Send "display and cursor on"
  LcdWrite(0, 0x01);                           // Send "LCD clear, jump to zero"

  LcdWrite(1, 0x48);                           // Send data 'H'
  LcdWrite(1, 0x69);                           // Send data 'i'
}
After running above test program, we should be greeted by our first two characters.
Now we are ready to run a more advanced example program that adds many helpful functions to control display and cursor settings: Rabbit_RCM3720_to_HD44780LCD_example2.c This program maps ASCII characters to the equivalent of the LCD character map. The LCD character map has some extra symbols not available in the standard ASCII table, like arrows and currency symbols. HD47780 compabtible displays have a second character map that provides additional characters for Japanese Katakana, Hiragana, accent and formula characters. The test program allows addressing both display lines through a easy-to-use LcdWriteStr() function, as the picture below shows.

Reference
- Connecting a HD44780 compatible LCD Display to a Rabbit RCM3720, 4-Bit mode URL
- TN211 Creating Custom LCD Characters - URL by Rabbit Semiconductor© Inc. (local copy: TN211.pdf)
- Rabbit microprocessors and their manuals are made by Rabbit Semiconductor© Inc.
- A zip file containing all examples, plus the latest library Rabbit_RCM4010_to_HD44780.zip